REDDNet Depot Installation Instructions: Difference between revisions
Jump to navigation
Jump to search
No edit summary |
No edit summary |
||
| Line 4: | Line 4: | ||
Before you begin, please make sure you have met the [http://www.reddnet.org/mwiki/index.php/REDDNet_Site_Requirements basic site requirements] | Before you begin, please make sure you have met the [http://www.reddnet.org/mwiki/index.php/REDDNet_Site_Requirements basic site requirements] | ||
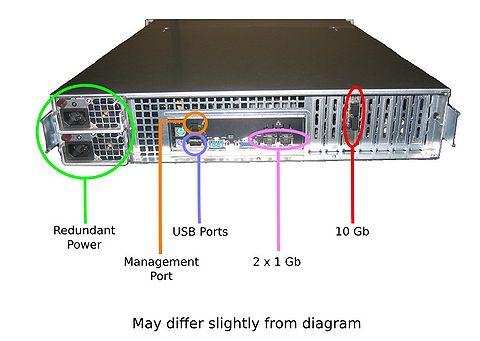
[[image:2010-depot-back.jpeg|thumb|480px|Back of depot]] | |||
# Unpack the machine, install the rails, and mount in your rack as you normally would. | # Unpack the machine, install the rails, and mount in your rack as you normally would. | ||
| Line 10: | Line 12: | ||
# Plug in the REDDNet USB key into a free USB port. | # Plug in the REDDNet USB key into a free USB port. | ||
# Plug in power cable. | # Plug in power cable. | ||
# Turn on depot. | |||
Revision as of 16:47, 1 April 2010
Installation instructions
IMPORTANT!!! Do not plug the power cable in until step 5. If you plug the power in before connecting the management network cable, then the IPMI module will not initialize properly and remote management/KVM will not work.
Before you begin, please make sure you have met the basic site requirements
- Unpack the machine, install the rails, and mount in your rack as you normally would.
- Plug in network cable to management port.
- Plug in appropriate network cables (10 Gb / 1 Gb)
- Plug in the REDDNet USB key into a free USB port.
- Plug in power cable.
- Turn on depot.
